
Generative AI Web App using Python Flask with Amazon Bedrock
Let’s create a generative AI-enabled web application from scratch using Python Flask. The application will provide a cloud security tip of the day by integrating with Amazon Bedrock using the amazon.titan-text-premier-v1:0 model.
This blog is an introduction to building a generative AI web application using Amazon Bedrock. The application provides a daily cloud security tip, however please note that detailed security aspects about Amazon Bedrock will be covered in the future. Stay tuned for more updates!
Prerequisites:
- An AWS account with access to Amazon Bedrock with `amazon.titan-text-premier-v1:0` foundation model enabled.
- Python installed on your system.
- Basic knowledge of Flask.
Steps:
- Create a new project directory:
mkdir cloud-security-tips
cd cloud-security-tips
- Set up a virtual environment:
python3 -m venv venv
source venv/bin/activate  # On Windows use `venv\Scripts\activate`
- Install Flask and Boto3 (AWS SDK for Python):
python3 -m pip install flask boto3
- Create a filename app.pyto create python3 flask app:
Use AWS secret manager or open source secret managers instead of hardcoded credentials.
touch app.py
from flask import Flask, render_template, request, jsonify
import boto3
import os

app = Flask(__name__)

# Load AWS credentials from environment variables
AWS_ACCESS_KEY = "AKIA2SAMPLE" #changethis
AWS_SECRET_KEY = "0nu-SAMPLEKEY-rJpP" #changethis
AWS_REGION = 'us-east-1'  # Change to your region


# Initialize the Amazon Bedrock client
bedrock_client = boto3.client('bedrock-runtime',
                              aws_access_key_id=AWS_ACCESS_KEY,
                              aws_secret_access_key=AWS_SECRET_KEY,
                              region_name=AWS_REGION)

# Home route
@app.route('/')
def index():
    return render_template('index.html')

# API route to get cloud security tip
@app.route('/get_tip', methods=['GET'])
def get_tip():
    model_id = 'amazon.titan-text-premier-v1:0'
    prompt = "Provide a cloud security tip of the day"
    response = bedrock_client.converse(
        modelId=model_id,
        messages=[{"role": "user", "content": [{"text": prompt}]}]
    )
    tip = response['output']['message']['content'][0]['text']
    return jsonify({'tip': tip})

if __name__ == '__main__':
    app.run(debug=True)
- Create a templates directory and an index.html file inside it:
mkdir templates
touch index.html
<!DOCTYPE html>
<html lang="en">
<head>
    <meta charset="UTF-8">
    <meta name="viewport" content="width=device-width, initial-scale=1.0">
    <title>Cloud Security Tips</title>
    <style>
        body { font-family: Arial, sans-serif; background-color: #f0f0f0; text-align: center; padding: 50px; }
        #tip { font-size: 1.5em; margin-top: 20px; }
        button { padding: 10px 20px; font-size: 1em; }
    </style>
</head>
<body>
    <h1>Cloud Security Tip of the Day</h1>
    <button onclick="getTip()">Get Tip</button>
    <div id="tip">Click the button to get today's cloud security tip!</div>
    <script>
        async function getTip() {
            const response = await fetch('/get_tip');
            const data = await response.json();
            document.getElementById('tip').innerText = data.tip;
        }
    </script>
</body>
</html>
- Run the Flask application:
python3 app.py
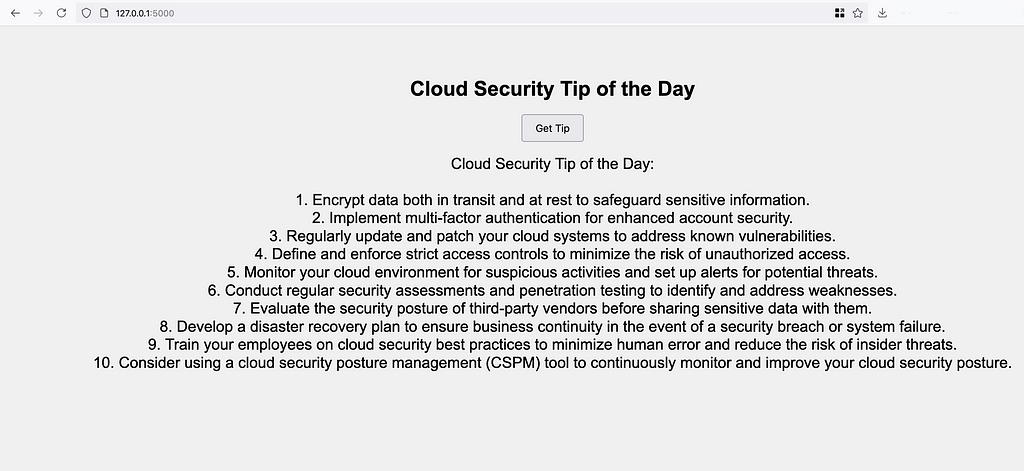
- Open your browser and navigate to http://127.0.0.1:5000. You should see the web page with a button to get the cloud security tip of the day.
Source code: https://github.com/justmorpheus
Explanation
-
app.py:
– Imports necessary modules for setting up flask.
– Setup credentials (for testing), in production/reality do not hard-code credentials.
Conclusion
By following these steps, you can build and run a generative AI web application using Python Flask and Amazon Bedrock.
In case of issues associated with converse method not available, refer to github issues.
References & Credits
Continue reading on Medium
Enjoyed this article? Visit Medium to leave a comment, clap, or follow Divyanshu for more insights!
Read on MediumMore Articles
How I Found a Path Traversal in the Rancher Dashboard via HAR Replay
The issue is considered as a hardening gap by the Rancher Security team, as it resides within a feature limited to dev mode in Rancher Dashboard. Finding bugs isn’t always about breaking into a live ...
EKS Moved To containerd, GuardDuty’s Runtime Alert Stayed Behind. Here’s Why That Matters.
Why this matters especially for startups relying on AWS GuardDuty? Why I’m Writing This Amazon EKS has moved to from 1.24 and later. Kubernetes removed dockershim in v1.24. Docker as a runtime is leg...